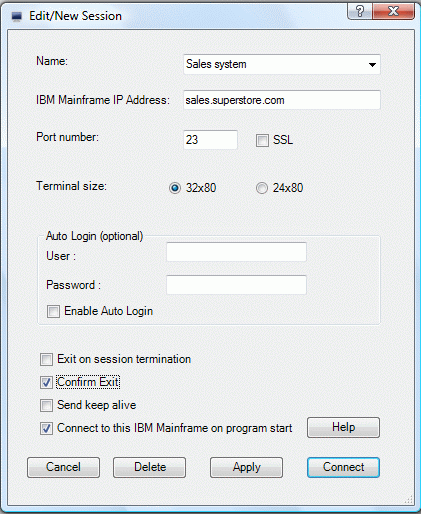
Mocha Tn3270 For Mac Os X Select Menu - Help - Insert License Key
CLIP STUDIO PAINT changes its edition according to the serial number. Please start CLIP STUDIO PAINT and follow the steps below: Select Register License from Help menu. For Mac OS X, select Register License from CLIP STUDIO PAINT menu. Enter the serial number for the edition you want to use. Click Register License button. This manual explains how to boot the Red Hat Enterprise Linux 7 installation program (Anaconda) and how to install Red Hat Enterprise Linux 7 on AMD64 and Intel 64 systems, 64-bit ARM systems, 64-bit IBM Power Systems servers, and IBM Z servers. It also covers advanced installation methods such as Kickstart installations, PXE installations, and installations over VNC.
A 3270 Emulator is a terminal emulator that duplicates the functions of an IBM 3270mainframe computer terminal on a PC or similar microcomputer.
As the original 3270 series terminals were connected to the host computer using coaxial cable, emulators required coax adapter cards to be installed in the PC. Today, many emulators communicate with the mainframe computer through the TN3270 variant of the Telnet protocol common on TCP/IP networks including the Internet, so special hardware is no longer required. Recabinet 3 keygen for mac.
Products[edit]
In 1983, IBM marketed the IBM 3270 PC, a bundled package including a PC, 3270 emulation software and coax interface card. 3270 emulators are also available from many third-party vendors like Attachmate and Ericom. Some solutions permitted a coax interface to be shared by workstations in a LAN.
See also[edit]
- Systems Network Architecture (SNA)
- Synchronous Data Link Control (SDLC)
External links[edit]
- x3270: open-source, multi-platform TN3270 emulator
- TN3270: emulator for Linux, Windows, Mac OS X
- Virtel: terminal thin-client emulation for 3270 mainframe screens
- QWS3270 PLUS, a TN3270 emulator by Jolly Giant Software
- QWS3270 Secure, a TN3270E emulator by Jolly Giant Software
- Vista tn3270, a TN3270 emulator by Tom Brennan Software
- Nexus Terminal, a TN3270/TN5250, SSH, SFTP/FTPS and printer emulator by Nexus Integration
- FlexTerm, a TN3270 emulator by FlexSoftware Inc
- Mocha TN3270, a TN3270 emulator by Mochasoft
- Extra! X-treme, a TN3270 emulator by Attachmate
- Host Explorer, a TN3270 emulator by OpenText (formerly Hummingbird)
- Personal Communications, PCOMM: a TN3270 emulator by IBM
- tn3270 X, a TN3270 emulator for Mac OS from Brown University
- Introduction to PCOMM and Communication Clients
- IBM Personal Communications (PCOMM) is TN3270 Windows client that may be used to connect a z/OS mainframe and TSO.
- During the period between 1950 and 1970s, there were no personal computers or no Internet or no TCP/IP. Mainframes used a character binary code called ECBDIC decades before ASCII and Unicode ever existed. Application programmers, system programmers, and users would communicate to the mainframe using 3270 ECBDIC, text-based, dumb terminal, and the SNA communication protocol. With a dumb terminal you cannot play computer games or use Microsoft Office. But 3270 terminals were very efficient. It was much better than using punch cards.
- In a modern world with personal computers, the Internet and TCP/IP IBM introduced the PCOMM as a Windows client. As a comparison, we use an Internet Browser (a HTTP client) to connect to a web server using TCP/IP.
- The functions of PCOMM 3270 emulator are to:
- 1) Enable zOS users to use the TCP/IP communication protocol to connect to a remote IBM mainframe and TSO.
- 2) Convert Windows ASCII characters typed on your keyboard to ECBDIC characters so that TSO can understand your commands.
- 3) Convert IBM ECBDIC characters sent by TSO to an ASCII character so that the character may be displayed on your Windows computer.
- 4) To interface with function of the Windows client operating system. PCOMM does not support MAC OS or Linux. (There are other TN3270 clients listed later.)
- Can I use my mouse?
- While it may appear that PCOMM may support a mouse, the mouse is only understood by Windows and PCOMM, not by IBM's TSO. Can you take a snapshot of a video game screen? Yes. Does the video game understand what you did? No.
- PCOMM will try to approximate cursor movement and convert those movements to a format that may be understood by TSO. However, using a Windows mouse with PCOMM may frustrate or confuse you when you are trying to move the TSO cursor. When connected to TSO it is best to use the arrow keys to move the cursor and the tab key to move between unprotected fields. Unprotected fields are where you may type or enter data.
- PCOMM also does not understand mouse clicks when you are in TSO, but you can use the mouse to manage PCOMM.
- Why doesn't TSO support a mouse? I thought that the mainframe was very powerful!
- To start, there was no mouse user interface available until the early 1980s - decades after the mainframe was introduced. A better question is why didn't they add the mouse, GUI or web interfaces later? Wouldn't these interfaces be more user-friendly?
- The estimated average processor overhead to manage a Windows operating system mouse and graphical user interface varies between 15% to 30% of the total processor power. To extend this microprocessor utilization analogy to the shared processor capacity of a TSO-based mainframe with 100-connected users using a mouse and graphical user interface, the mainframe would have no more processing cycles to do any other work.
- It is also estimate that the new gesture-based interfaces use on cell phones, mobile devices and personal will increase processor utilization to over 40% of the processor's core capacity. Your personal computer is not shared. You can allocate your processor's capacity to any user interface you may want, e.g., voice, mental telepathy, or communication with the deceased. (I prefer mental telepathy.)
- (Hopefully, you will appreciate the introduction of multicore processors. i.e., one processor core to manage the user interface the second processor core to get work done. Can you exceed this analogy to battery life of your mobile device?)
- RDz - Rational Developer for z Systems
- IBM and other third party providers do provide GUI clients. For example, IBM Rational Developer for z Systems provides an enhanced toolset for creating and maintaining z/OS applications quickly and efficiently. This rich set of GUI TSO, COBOL, PL/I, C++, assembler and Java development tools designed for batch, IBM CICS, IBM IMS and IBM DB2® environments are optimized for the workstation-based Eclipse platform. RDz is available for almost every client operating system, You can get a free 90 day trial of RDz at http://www-03.ibm.com/software/products/en/rational-developer-for-z-systems
- RDz connects through a special RDz server and the RDz is licensed per workstation and per server. TSO, ISPF, and other text-based tools come with every mainframe with no extra cost. So as a System z manager would increase their budgets to make their entry level system z professionals happier by providing mouse and GUI capabilities. RDz executes on the client-side and hence adds little user-interface overload to the mainframe processor core.
- Other TN3270 and operating system clients
- You must manually enter TCP/IP connection information for the following clients.
- Hostname or IP address is192.86.32.17
- TSO Port Number is 623 (Make sure that your firewall does not clock this port.)
- While PCOMM is software designed for the Windows platform, other TN3270 emulators are available for Windows, MAC OS X and Android. Just enter the keyword TN3270 into Google and search for your operating.
- Windows TN3270 and Master the Mainframe Contest. Tom Brennan Software is providing their tn3270 client along with licensing to all contestants of the Master the Mainframe contest. Follow this link, download, and install Vista V1.27: http://www.tombrennansoftware.com/download.html Many RMU students prefer this version over IBM PCOMM. Installation and other directions are provided. After signing up for the Master the Mainframe contest check the email from the IBM Master the Mainframe Contest team for the license key that allows permanent use of Vista tn3270.
- MAC OS X - Brown University provides a tn3270 client that is freely-licensed for non-commercial use. Download it from here: http://www.brown.edu/cis/tn3270/ Select the tn3270 release that supports your OS X version. Most Mac users will select the latest 3.4.0 release as it supports OS X 10.3.9 and later.
- Android and IOS TN 3270 Apps for your mobile device
- Android Mocha TN3270 Lite - A free version is available from the Google Play store. The paid version includes keys f1-f24. https://play.google.com/store/apps/details?id=dk.mochasoft.tn3270lite&hl=en
- Apple iOS Mocha TN3270 - Lite The MAC version may be found at
- https://itunes.apple.com/us/app/tn3270-lite/id290608522?mt=8
- You cannot install PCOMM on a MAC Computer unless it has Windows installed. However, you can used RMU VMWare View to remotely access a RMU Lab computer. VMWare view has both PComm and IBM RDz installed. You can install a VMWare View client on either your Windows or MAC computer. The most direct method to access the RMU IBM mainframe is to install PCOMM on a Windows based computer or use an RMU lab computer. However, you may install VMWare View on a MAC computer, then connect remotely to a RMU Lab computer, then use the IBM PComm or RDz to connect to the RMU IBM mainframe computer. For more details about RMU VMware View visit http://www.rmu.edu/web/cms/departments-offices/administration-services/it/Pages/vmware-view.aspx
- The RMU or RESNET Help Desk may assist you with this process. The RMU Help desk is 412-397-2211 and is located in the second floor of Hale. The ResNet Help desk is 412-397-2299
- Step 1. As per your instructor's directions download and unzip the PCOMM zip file. Unzip the installation files to a folder on your local drive. Use the default name or create or customized folder name.
- Step 2. After unzipping the file locate the Setup.exe file under the mls sub folder. For example:
- Step 3. Double left-click the Setup.exe file to start the installation process. Left-click on Next.
- Select “I agree to accept the License agreement.” Left-click on Next
- Step 4. Enter your User Name and Organization. Left-click on Next
- Step 5. Select the Typical Installation, and the left-click on Next.
- Step 6. Normally one would select the User’s Application data folder, but there may be exceptions. Left-click on Next
- Step 8. When the installation has been completed left-click on finish and then select Yes restart your computer.
- Step 9. PCOMM recommends that the user creates a configuration file, called a WS file. A utility program has been installed that will enable you create a customized PCOMM User Session file. This process will be presented later. In the meanwhile, your instructor will make available for you the RMU IBM.WS file. You may click on the file directly, e.g., in Windows Explorer, or create a short-cut to the RMU IBM.WS file. The WS file is an executable configuration file and will automatically create a user session. The following is an example of a Windows desktop short-cut.
- When using RMU IBM.WS, PCOMM will connect the RMU IBM mainframe at IP address 192.86.32.17 and port number 623. Since access to the RMU IBM mainframe is provided by TCP/IP, you may use any client-based tool, e.g., ping, Putty, WinSCP, etc.
- Port 623 will connect you to IBM’s TSO. Time Sharing Option (TSO) is an interactive time-sharing environment for IBM mainframe operating systems. When connected to TSO commands are enter at a command prompt, similar to Linux or Windows. TSO is most commonly used by mainframe system administrators and programmers. It provides:
- • A text editor
- • Batch job support, including completion notification
- • Debuggers for some programming languages used on System/360 and later IBM mainframes
- • Support for other vendors' end-user applications, for example for querying IMS and DB2 databases
- It is recommended to click on the RMU IBM.WS file to START PCOMM. This file will contain text information similar to the following that will provide the IP address and Port number. More importantly if will change the terminal colors from a default color which is VERY difficult for your instructor tor read in your assignments to a better color combination. If the instructor cannot read your hands-on documentation in an assignment you may get zero credit. See sample WS file.
- Most IBM mainframes will automatically start ISPF. Interactive System Productivity Facility (ISPF) is a software product for the z/OS operating system that provides a menu driven user-interface. With TSO, the user must remember and manually enter each command. With ISPF, a user friendly menu system will prompt you for various parameters and options.
- Video TSO ISPF Lesson1 Logon - Introduction to Sign On - http://www.youtube.com/watch?v=RSUaUok3d-E&playnext=1&list=PL15A1FCA4DA7EB758&feature=results_video
- Step 10. Double left-click on the RMU IBM.WS short-cut or file name. The following connection should be made.
- Before one starts there are two important criteria to understand. First, the old-style IBM 3270 terminal keyboards were different that your PC keyboard. Your PC keyboard has function keys, e.g., F1..F10 keys, similar to the IBM 3270 terminal which had PF1..PF13 keys. But, the standard PC key boards do not directly support a second Enter key or the program-attention keys, e.g., PA1..PA3. A 3270-emulator maps different PC keys to perform the same function. For example, PCOMM maps the RIGHT CTRL, to represent the popular IBM 3270 Enter key. Be careful, there are two Ctrl keys on the keyboard. Only the right Ctrl key is applicable. The PA1 is an important key when a Job hangs-up. PCOMM maps the PA1 key to ESC key
- ISPF displays text in protected regions of the terminal window. While the cursor will move anywhere in the terminal window, you can only type in an un-protected area of the window. Sometimes it is easy to distinguish between protected areas (where you can NOT type) and un-protected areas where you CAN type. For example, some unprotected areas are underlined.
- The cursor will appear at the left-bottom line of the TSO logon. Type logon xxxxxx, where xxxxxx is your TSO user-id assigned by you instructor. TSO IDs can be up to up to eight characters in length. TSO is not case sensitive. After finish typing press the Right CTRL key (NOT THE ENTER KEY)
- .
- After entering the LOGON command a LOGON parameters panel will appear. Parameters are information that a command needs. In this case you need to enter your password. The first time you LOGON you will enter the instructor-supplied password, e.g., bluesky, at the Password prompt. As you type your password it will not be displayed. The cursor will move, but your typed password will be hidden.
- During the first LOGIN you will be required to change your password at the New Password prompt. You can move the cursor or press the Tab key to move between un-protected areas. Your new password must 8 characters or less. After entering a new password you will be prompted to re-enter and confirm you password change. Think of an Unprotected area as one that will accept your keystrokes, i.e., accept your typed password.
- If incorrectly type your password or attempt to change your password three-times, TSO will lock you out of the system. Whenever you are locked out of TSO (which is rarely) you must contact your instructor to reset your account and password. Most students rarely have this lockout problem.
- In the panel display above, the cursor was moved into unprotected area. When you type a character an error appears at the bottom of the panel. Simply move the cursor to an unprotected area.
- After successfully entering or changing your password, the following panel will appear. When three asterisks appear the TSO operation is complete. Press the Right Ctrl key to continue
- Most students are comfortable with a graphical user interface (GUI) similar to various versions of Windows and the MAC OS. TSO is a command-line interface a little bit similar to Unix and Linux. However, TSO has no mouse, touch pad, or graphics. To control TSO, users must manually type commands. Command-line user interface operating systems are much more efficient and secure as compare to GUIs. However, users must memorize the command lines and various options.
- IBM provides another alternative called ISPF (Interactive System Productivity Facility). On the RMU IBM mainframe TSO automatically starts ISPF. ISPF is a menu-based system that makes it easier to use popular TSO commands (without memorizing TSO commands and options), editing and developing applications, and menu -system to access other popular z/OS utilities, e.g., SDSF, RACF, SPUFI, OEDIT, etc. ISPF is organized into a series of panels. The first ISPF panel is always called the ISPF Primary Option Menu. This panel will list menu numbers and abbreviations, e.g., SD, R, etc. which will route the user to customized TSO services appropriate to the current TSP logon user-id. ( ISPF Primary Option Menu lists those functions that your Boss or instructor will let you do. The more complex your ISPF Primary Option Menu is the more you are a big shot. )
- If you had used the RMU IBM.WS file to connect the ISPF Primary Option Menu will appear similar to the previous. The RMU IBM.WS file uses different color and display size settings than the default. You may see a see an IBM License box super-imposed (not shown below). To clear this IBM License box press right–Ctrl key (ENTER).
- To continue to another panel you type a panel number or utility abbreviation code on the option line and then press the Right-Ctrl key to continue.
- ISPF displays a set of customized, configurable display panels appropriate for the current logon TSO user-id. There are three important concepts to understand. First, ISPF calls a display a “panel”. Second, since ISPF is configurable by the system programmer for the needs of the user, it will appear different for each role, e.g., application programmers, DBA, analyst, security, system engineer, etc. and company. However, the basic operation of ISPF remains the same. Third, most functions performed by ISPF can also be performed at the TSO or Linux command prompts, or other web and mobile command interfaces. ISPF, historically, has been the most popular z/OS command interface and is available at no extra cost. While other alternatives may be more user-friendly at an extra cost, it is expected that ISPF will continue to be used for the foreseeable future.
- Important to Remember !!
- TSO is not an operating system. TSO is a user interface Operating systems control the hardware, manage memory, storage, file (dataset) systems and execute user applications. To interact and manage IBM operating system functions, historically, system programmers would type 80-column punched cards on a punch card machine and then input this to the operating system (See below.)
- TSO was an add-on to IBM operating systems, which permitted system programmers to enter operating system commands through a keyboard and monitor (a 3270 terminal) similar to the way we use Putty to enter commands in Linux or Unix. TSO is the user-interface - z/OS is the operating system.
- Later IBM added ISPF as an add-on to TSO. It provided the menu panels and a full-screen text editor. So ISPF is an add-on to TSO. Later in the course, RDz (Rational Application Developer for System z) will be introduced. This is GUI interface similar to Microsoft Windows and Visual Studio. RDz is based on Eclipse, an open-source product.
- PCOMM has a Disconnect button located on its top menu panel. You can click on this Disconnect button, but this solution is not very elegant.
- To exit ISPF from any panel type =X on the option line and press the Right-Ctrl key.
- Normally, after entering =X one would return to the TSO READY prompt. Type LOGOFF and press the Right-Ctrl key.
- After typing =X on the ISPF option line, on a rare occasions, a ISPF panel may appear indicating whether you want to Print the ISPF Log file. Simply enter 2 to delete this file and press the Right-ctrl key.
- When you exit ISPF you are still logon to TSO. The READY prompt proves this. You can restart ISPF from the READY prompt, by simply typing ISPF and pressing the Right-Ctrl key. In some courses, your instructor will require you to learn and execute TSO commands at the READY prompt.
- ISPF
- Your instructor may require you to practice with the ISPF interface and submit a job to copy datasets to your user-id. The following will provide you with extra practice with ISPF.
- Logon to RMU z/OS. If you had used the RMU IBM.WS file to connect the ISPF Primary Option Menu will appear similar to the following. The RMU IBM.WS file uses different color and display size settings than the default. You may see a see an IBM License box super-imposed (not shown below). To clear this IBM License box press right–Ctrl key (ENTER).
- Navigation Between ISPF Panels
- The Option > is a command line. Reviewing the previous ISPF panel, one will see an arrow pointing to the Option line. As is normal with an unprotected area, the line is underlined. This means that you can type one of the menu options. For example, you can type a 3 to navigate to the Utility panel. Or you can type SD to navigate to System Display and Search Facility (SDSF) panel. Menu options are separated into two groups; The numbered options displayed normally in the upper area of the panel normally. These represent the standard panels and functions built directly into ISPF. The Other Install Products area presents add-on panels provided by more advanced products than ISPF. These navigation identifiers are represented by one or two characters. Other Install Products may also be provided by third-party vendors.
- Type the number 3 on the Option command line and press the right-CTRL key or your appropriate ENTER key.
- The following Utility Selection Panel should appear. Now type the number 4 on the Option command line and press the right-CTRL key or your appropriate ENTER key.
- The following Data Set List Utility should appear. Data Set is z/OS's name for a file. Windows, Unix and Linux (Mac OS) stores data on a storage device as a file. IBM stores data on a storage device as a data set. This utility will display your datasets in a similar manner that Windows Explorer displays files. Each of us are very comfortable using Word to Open a Word document or file. In z/OS terminology we would edit a data set. z/OS calls it a Data Set, and Windows, Linux and Unix call it a file.
- Each data set name can be up to 44 characters and cannot include spaces. This is significantly different than the Windows, Linux and Mac OS file systems.
- The z/OS file system is not hierarchical. This means that it does not have a folder (directory) or a subfolder (subdirectory) to organize and secure files. For example, some instructors organize their Windows files as a collection of folders and subfolders, e.g., Classes/INFS3212/Tests/Test 1. The z/OS file system will not permit a hierarchical folder system. However, later zLinux will trick z/OS to make its file system appear to hierarchical.
- The z/OS file system uses a different system to organize files. It uses a 'segment' or 'qualified' file name. Consider the following data set name: RMUI001.COBOL.ASSIGN1 This data set name has three segments; each separated by a period. The leftmost segment name, e.g., RMUI001, is called the high-level qualifier (HLQ) - the most important. The rightmost segment name, e.g, ASSIGN1, is called the lowest-level qualifier (LLQ)
- Enter your LOGON name as the HLQ (highest level qualifier). In this example, my TSO User-IDN name to display my data sets. For example, your User-ID, e.g, RMU001, will display your data sets. The default security system will prevent each student and faculty member from displaying other datasets. But, it is important to realize that each user's data sets may be stored in the same volume. Unlike Windows which will separate each user's file's by storing them in separate subfolders, z/OS frequently distinguishes data ownership by the HLQ segment.
- If the objective of entering RMUI001 into the Dsname Level option is to display all data sets owned by user account RMUI001, what would be displayed if one had entered RMUI001.COBOL? Hopefully, your answer would be something similar to datasets with the partial qualifier named COBOL (source code) owned by user account RMUI001. RMUI001 may also store data sets named RMUI001.JCL, but these datasets would not be displayed when RMUI001.COBOL was entered. The Window's file system (NTFS) organizes files by folder. z/OS organizes data sets by qualified segments in the data set name.
- How many segments may a data set name have to organize data sets? - As many as you wish. As long as you do not exceed 44 characters, including the periods. Rarely are more than four segments used. Since each data set name must be unique when stored in a volume, not matter whomever is the owner. The importance of DASD serial number and volume names ( not discussed here, are also very important to organize data sets.
- For now, type your LOGIN name Dsname Level line and press the right-CTRL key or your appropriate ENTER key. Your results should appear similar to the following.
- A z/OS JOB is a unit of work that z/OS uses to start and manage batch jobs. One may think of a JOB as executing a program like you right-click on an icon to execute a Window's application. Sorry, but no one will be able to right-click on an icon in this class. Submitting z/OS JOBS is much more powerful than executing Windows applications. However, for now it is O.K. to think that to submit a job is similar to right-clicking on the mouse or executing a program.
- The following JOB will copy data sets from a system library into your storage area using your HLQ segment, e.g., RMU001. At this point, you can execute this job successfully only once. If you execute this job incorrectly, there will be little evidence to help debug your typing error. So be careful to type in the following command carefully.
- Complete the following steps
- Step 1. Type the following on the ISPF option (Option > ) line
- TSO SUBMIT 'RMU.PUBLIC.JCL(LAB)'
- The TSO command means to shell out to TSO command and execute the following SUBMIT command. It is important to notice that TSO is executing the command, not ISPF. ISPF provides a panel that will make this SUBMIT command to type. This ISPF Batch utility will be discussed later.
- After following the TSO command with at least one space, type the SUBMIT command.
- After following the SUBMIT command with at least space start with a single-quote (located near the ENTER key on your PC keyboard) and followed by the data set or dataset member name to be executed, this example will end with a closing single-quote.
- z/OS commands are not case-senstive. However, these commands require the correct spacing, data set name or dtaa set member name and punctuation. If you incorrectly type this command you will get an error code. Interpreting this error code requires a little more experience that presented now. Try ot be careful when typoing this command.
- Step 2. Now press to the Right-Ctrl key to execute.
- This example illustrates the execution of this TSO command at the ISPF Primary Option Menu panel. In fact, every ISPF panel has an option of command line.
- Step 3. After seeing the three asterisks ***, TSO has completed executing your SUBMIT command. At this point we will not be able to determine if it was successful or failed. Every time you see the three asterisks, press the right-Ctrl key when using PCOMM to continue.
- Step 4. The display will clear and you will see a message similar to the following. First, notice that the Job Entry System assigned a unique JOB number to identify your job, i.e., JOB02629. Each JES job is assigned a unique number. The name of the JOB is LAB. Most importantly the MAXCC=0000. MAXCC is the job error code. A value of 0000 means that the job executed successfully. If you encounter an error code other than 0000 at this point this means either you cannot type, e.g., the previous command, or this command was executed twice. You can only executed the LAB job only once.
- After seeing the three asterisks ***, press the right-Ctrl key to continue. If encounter a non-zero error return code, try correcting your typographical error. Details concerning this error code will be discussed later in the course.
- What does a MAXCC=0000 really mean? It means that you had no z/OS system programming syntax error, z/OS system error, or JCL error. If you were compiling a COBOL program a MAXCC=0000 does NOT mean that you didn't have any COBOL errors. To discover the details for errors and batch program output, one frequently has to use the System Display and Search Facility (SDSF). For now, we are expecting you to type the TSO SUBMIT command correctly.
- Step 5. Assuming that you correctly executed the job, return to the Data Set List Utility. In the previous example, we navigated through several ISPF panels, one at a time. As you gain experience with ISPF, you will quickly know how to jump directly to the ISPF panel you want. On the Option (or command line) type =3.4
- The leading equal sign (=) means to navigate directly the designated panel, i.e., 3.4. If you would have omitted the leading equal sign (=) you would have seen an error message. In the ISPF Primary Option Menu panel, there is no 3.4 panel. There is a 3 panel, labeled Utilities, but no 3.4 panel. =3.4 is a popular shortcut. Memorize it.
- Type =3.4 and press the right-Ctrl key to continue.
- Step 6. The following Data Set List Utility panel, listing your account number, should be displayed. Press the right-Ctrl key to continue.
- In the following example document that your job successfully executed and copied the appropriate sets to your account. All of your data sets should begin with a HLQ using your account name. It should appear similar the following.
- LOGGING OFF From ISPF
- Press ISPF F3 key once or several times to exit ISPF or enter the =X, ISPF navigation command and press right-ctrl to exit.
- Most of the time you will cleanly exit to the TSO READY Prompt. However. as you become a more sophisticated user of ISPF, you may see a prompt concerning the ISPF Log data set (SPFLOG1.LIST). The ISPF data set is a log of activities that you perform since the beginning of the session. In simple terms it is a log of what you have done. The normal action is to select the DELETE the data set without printing option.
- The Specify Disposition of the Log Data Set Panel will appear as displayed below. Enter 2 as a selection to the right of the Process Option and press the right-ctrl key to execute.
- TSO Ready Prompt
- At the TSO Ready Prompt type LOGOFF and press right-ctrl to execute the command. If you made an error, you can restart ISPF by simply typing ISPF
- Important: If you forget to logoff , TSO will permit only one connection per userid. You will not be permitted to login again until after one hour has past. PCOMM is not connect to the session, but TSO thinks that you are still there. After one hour of inactivity TSO will automatically log you off.