Mac Could Not Create A Preboot Volume For Apfs Install
Mac; Desktop Enhancements. The life of those that need to check the current time and date of any time zone in the world. World Clock is complete, however we will add more features as time goes. Free desktop clocks for pc. Best Clock app I have seen for Mac (AU) Fabulous design (US) Absolutely excellent clock and time zone app (AU) Simple! I use it everyday! (UK) Perfect for Global Responsibilities(US) Completely redesigned, The Clock 4 Bigger than ever. The Clock. Keep track, easily and efficiently of your contacts in different time zones. Time Zones allows users to scan preset cities around the world, for their current times. Just click the icon on the Status Bar and all your saved cities and their current times will be displayed. Time Zones allows you to chose between two clock styles making the app very customizable.
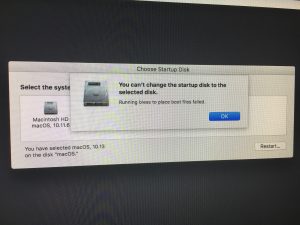
So I now get the Can't create preboot volumke for APFS to install. After hours of getting everything up to spec, the absolute crap that Apple has out there fails and I can only now reformat my drive back, reinstall macOS on HFS+.
| When attempting to reinstall the OSX high sierra but continued receiving 'Could not create a Preboot Volume for APFS install.' Basically stating that Preboot Execution Environment (PXE) wasn't installing on the APFS forever reason. So, this is how I resolved it without a creating a boot USB. |
| 1) Rebooting the system while holding the (command-option-r) keys until the Internet installer prompt screen appeared. |
| 2) Setup the Wifi connection |
| 3) Once a copying of the Apple utility component is installed. The system will reboot to the Mac OS utilities screen. |
| 4) Select the disk utility, then press continue. This is where I believe issue originated from because before I was only given the option to select one of the AFPS varieties. However, with the Internet installer I'm given the ability to select from others such as Journaled and Fat32. Select the Journaled FS and then press Erase, which will delete the old content and reformat the drive. |
| 5) Once that's done go back out to the utilities screen and select reinstall OS and continue. This may take a while but it obviously all depends on your network speed. Nevertheless, once that's completed you will boot back into your system and be prompted to setup the basic system requirements. |
| That's all folks |

commented Aug 9, 2018
This worked for me. The key was to go into the Internet installer prompt. Thanks for sharing it here. Cheers! |